Kensington Palace: Royal Style in the Making

 Although I have had a number of enjoyable visits to Kensington Palace before, this is the first time that I have had the opportunity to see her wedding dress on display.

‘Royal Style in the Making’ explores the relationship between designers and their royal clients, and the meticulous and creative processes that occur behind the scenes. Five designers, spanning from the 1930s to 1990s are the focus of the exhibition, which showcases how they created some of the most iconic fashion moments for three generations of royal women.

The designers on display are Madame Handley-Seymour (dressmaker to Queen Mary and the Queen Mother); David Sassoon; Norman Hartnell and Oliver Messel; but the main focus is on the work of the Emanuel’s and Diana’s wedding Dress.

A snapshot into the atelier is on show, with patterns, fabrics, sketchbooks, photographs and interviews. Its in the latter that some interesting details were shared about how they kept the creation of Diana’s wedding dress a secret, from using fake names for appointments, the embargo agreements, how every sketch, fabric and pattern was kept in a City of London bank vault and throwing incorrect fabric and thread scraps in the bins so when journalists went through their rubbish bins, they wouldn’t be able to guess what the dress was going to look like.


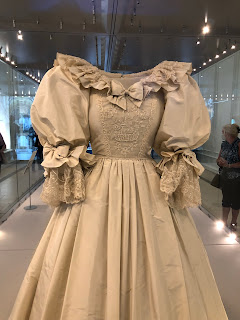
The dress itself is the main focal point with its 25ft train in a glass case, which you can walk easily around to get a 360 degree view of the detailing. The attention to detail is remarkable, but the creases in the silk taffeta fabric drive me mad! Even now, and I’m sure this dress has been lovingly cared for and preserved, the creases can still be seen. However, that is a small thing compared to its iconic status as an important royal garment.

Some of her other key pieces are also on show by the other designers, such as the pink dress and jacket by Belville Sassoon that Diana first wore on her Royal Tour of Australia in 1982, and the black silk velvet dress by Norman Hartnell worn by the Queen Mother.

Entry to the exhibition comes with access to the rest of the house and grounds, which are also wonderful to visit. The current exhibition in the house focusses on the childhood of Queen Victoria, and if you have ever seen the movie The Young Victoria or the ITV series, Victoria, a lot of the artefacts and information on show will make a lot of sense. The rules from the Kensington System are on the wall (and yes, she really wasn’t allowed to walk down the stairs unaccompanied), her love of opera and ballet is very evident, and the actor Mark Strong’s resemblance to Sir John Conroy is uncanny when looking at his portrait.

You can also glimpse the new bronze statue in the sunken garden unveiled by Prince William and Prince Harry to honour their mothers 60th birthday.

It’s a very enjoyable day out and the Royal Style in the Making exhibition is on display until 2nd January 2022. Try and see it before it finishes!

Handmade Christmas: Make a Christmas Pudding Decoration

Its Christmas Eve! Santa is on his way ;)

Want to create a little me-made make to add to your Christmas Tree before the big day tomorrow? Why not make one of my Christmas Pudding decorations!

You can also take a look at the decorations from Christmas past; the Stocking, Snowman and Present on my Learn to Sew page


How to Make: 
1: Cut out all of the pattern pieces on the instruction sheet below, and pin and cut them out from your fabrics of choice. I used felt but other fabric scraps could be used...whatever you have around the house!
The grey dotted lines on the pattern give an idea for positioning when layering up the various shapes. 
Double check on the pattern pieces that you have cut out enough of them; pudding base x 2; icing x 2; holly leaves x 2 (the red berries can be sewn with embroidery thread rather then cutting them out if its easier). 
2: Place one of the icing shapes at the top of one of the pudding base shapes. Stitch this in place with a running stitch; remember to tie a knot in the thread at the start and end of your stitching so it doesn't come undone. Repeat this step again for the other pudding base and icing shapes. 
3: To one of the pudding bases, sew the holly shapes and berries at the top where the icing is. I only stitched these to one of the shapes, but you could add this detail to the other pudding base if you wish. For the berries, i used red embroidery thread and stitched a 'knot' stitch for each one. 
    > Take a look at this link from sewguide.com for how to create a knot stitch if you're unsure
4: Place the 2 pieces of the pudding base together. Pin in place and sew together with slip or running stitches around the outside. Remember to tie a knot in your thread at the start and the end so your stitches don't come loose
5: Lastly, cut 20cm of red ribbon. Join the 2 ends of the ribbon together and sew the ends to the top/ back of the Christmas pudding. 

To make your own Christmas Pudding decoration, download the free pattern below!


Me Made Christmas Gift 2021

Following the sneak peeks on Maker Monday of the fabulous creations made by my friends for our annual Christmas meet up, i thought i'd share what i created with some instructions of how you could make one yourself. 

This year's make was a wire Christmas hanging. 


Take a look at the steps below to make one for yourself.


Step 1: 
Using some craft wire (this was from Tiger but other craft or floristry wire could be used as an alternative), mold the wire into a circle. I did this 3 times to create a full circle and twisted the ends together to secure. 
Step 2 & 3: 
Place the circle on top of a piece of paper and draw a picture of what you would like to mold the wire into for the centre decoration. I drew an outline of a house, two christmas trees and a snowman; I found it best to draw a line at the base of the picture as this would help to secure everything and keep its shape. Then using lengths of wire, mold the wire to follow the drawing. You may need some pliers for this and you may want some gloves to protect your hands - the wire can get sharp when its cut! To help stabilise the wire, i ran a straight length of wire at the base of the decoration and twisted it around certain areas of the wire 'drawing' to help keep the shape consistent. 

Step 4:
Twist the ends of the centre decoration around the base circle to hold it in place. You may also need to use pliers to soften the edges of the wire where it joins the base circle, 

Step 5:
Using lengths of wool (or coloured ribbon), tie some to the bottom of the base circle to fill in the wire. 

Step 6: The finishing Touches
I added a small piece of wool around the snowman's neck for the scarf; a hat could also be added if needed. 
At the top of the circle. I added a pre-made bow (one could easily be made with some scrap fabric, ribbon, and a pipe cleaner or a sandwich tie), and tied a loop of ribbon behind it. 

That's it! its quite a simple, quick make but one that adds a nice handmade touch to the Christmas decorations. 


I also made a quick paper bird decoration to add to the gift wrap from recycled wrapping paper. I didn't come up with this ;) its a fab make from the wonderful Kirstie's Handmade Christmas instead! Take a look at how to make it here on Raise the Roof Productions website, and a picture of my version below. 


Maker Monday - Christmas Edition

 A tradition amongst my friends and I is to gift each other me-made presents at this time of year. I'm a major fan of Kirstie's Handmade Christmas (currently showing on Channel 4 - a must watch!) which gives me lots of great ideas of what to create each year. 

Much love to Lavenders World - Finds and Fabrics for my fab fabric bundle (if you love vintage fabrics and trims, she is definitely worth a follow on Instagram); and to Nataliya for my painting. 

Also thanks to Piccolino's Birmingham for hosting our annual xmas visit number 8! See you next year!

The Sewing 12 Days of Christmas Returns! On the 1st Day of Christmas...

Its that time of year again!

The Sewing 12 Days of Christmas is back!

Head over to my Etsy Store and pick up your Sewing Box and Pattern Bodice Tote Bags now, and join me in singing along....

'On the 1st day of Christmas....'