
Re-fashion Series: Project 4
With Me Made May and reduce-reuse-recycle week on the Great British Sewing Bee this week, I thought i'd post a throwback to a memade/ re-fashion project - recycling a kimono into a cami vest. It would be a shame to waste the nice print on the fabric, and in this silhouette, its something i can get more use out of.
 |
 |
 |
In the further adventures of the Tailored Coat....
And so it continues...
I'm now moving on to the back panels. The pleat detail from the front shoulder carries through to the back yoke. This took quite a while to match up at the centre back seam, and in the end had to resort to traditional hand-tacking methods (something i don't use often), to get them to line up. The pleated panel is also backed onto a base fabric and fused for extra support.
Underneath the back yoke, a series of vertical panels help to give a good fit at the back and eliminate my sway back problem. Sway backs causes clothes to bunch or sag at the small of your back, but can be accommodated with clever cutting in the seams.
 |
 |
Classes on hold at The Sewing Cafe
This May I was due to return to The Sewing Cafe for our 4th year of pattern drafting and alterations classes but sadly, Covid-19 has put those on pause for the moment. So i'm throwing it back to some of our previous workshops and the amazing makes and custom sewing projects that have been created over the years.
I'm looking forward to seeing everyone again soon, but in the meantime, happy isolation sewing!
P.S: anyone recognise their project?
I'm looking forward to seeing everyone again soon, but in the meantime, happy isolation sewing!
P.S: anyone recognise their project?
 |
 |
The Tailored Coat Adventures continue!!
I'm continuing with my tailored coat project, and next up is to assemble the
front panels and insert the zip.
I don't particularly like when you can see the zip on the front of a coat, so I try and make sure that its inserted in a seam. This took a bit of testing but
its turned out well.
I've also love a good pleat detail on the coat; i try an incorporate a unique
twist to what could be called a 'commercial' garment; I think it looks more
interesting.
 |
 |
#bigcommunitysew: How to Make a Face Mask
I'm joining in with the Big Community Sew to make face masks for my family, friends and neighbours.
I've documented my making journey in this handy step-by-step guide that you can also follow and a free face mask pattern download is below for you to create at home.
Click on the instruction book below to make your own. If you have any questions, please get in touch on; studio@sianriley.co.uk


I've documented my making journey in this handy step-by-step guide that you can also follow and a free face mask pattern download is below for you to create at home.
Click on the instruction book below to make your own. If you have any questions, please get in touch on; studio@sianriley.co.uk
Free Face Mask Pattern to Download:

@bigcommunitysew . #bigcommunitysew
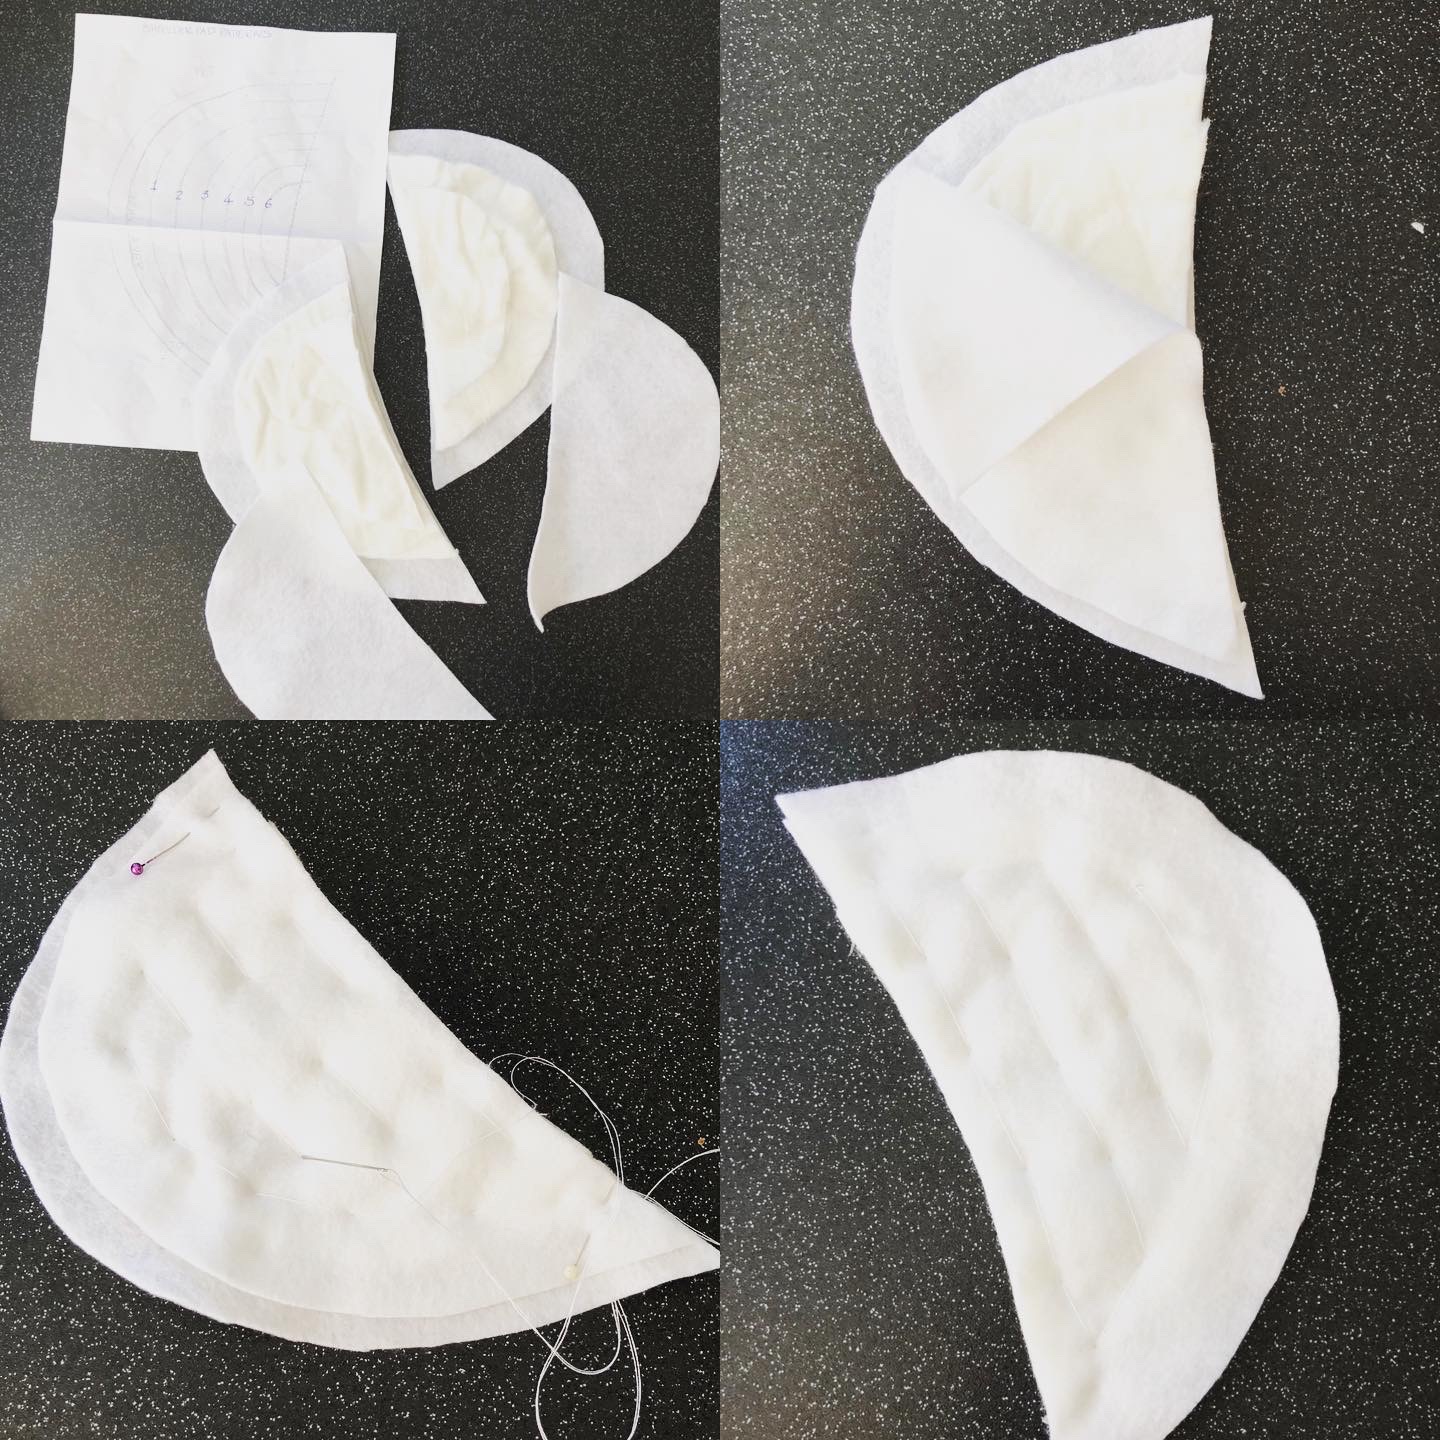
Tailored Coat: Shoulder Pads
Moving onto shoulder pads...
You can buy shoulder pads but they can be quite expensive. I've found that if you buy the fabrics, its quicker and cheaper to make your own.You only need felt (available from most craft and haberdashery shops) and wadding
Two layers of felt; a top and under layer (this one is slightly smaller), with three layers of graded wadding or batting in between. Rows of handsewn backstitches secure them all together through the middle. I also run a loose running stitch around the outer edges too.
Patterns for the shoulder pad shapes are widely available for free online. I think i found mine on pinterest :)
 |
 |
Tailored Coat: Fusing
And we're carrying on with the tailored coat journey...
I'm now on to the interfacing (or fusing/ vilene/ fusible interlining as its also known). As i don't have the resources to fully tailor my coat, i'm making it semi-tailored instead. Well-placed fusing helps to reinforce the wool fabric to improve its strength, and a heat press is the best way to evenly bond it.
You can use a domestic iron if you wish, but turn the steam off, highest heat possible (you may need a protective layer of scrap fabric between the iron and your final fabric if its delicate), and stamp you iron evenly over the fusing. Don't move the iron forwards/ backwards across the fabric as its fusing as this will cause the fabric to stretch. You can also block fuse the fabric first, but i find that this can waste a lot of fabric, so prefer to cut to size but do more fabric prep instead.
Tailored Coat: time to cut out!
The adventures of my tailored coat continue...the fabric is laid out and prepared; the patterns and grainlines have all been aligned with the selvedges. Each of the 30 plus pieces of pure wool, lining and interfacing are all ready to go...and on to the next stage!
 |
 |
Tailored Coat: The labour of love continues!
Continuing into Me Made May is the labour of love that is my new tailored coat. The patterns have all been drafted, including the linings - now to prep the fabric all of which is either reclaimed or recycled.
Did you know that its really important to steam your fabrics before you cut them? This helps to remove the natural elasticity from the fibres and helps with shrinkage. You can also wash the fabrics before steaming them as this also helps to prepare the fabric.
Did you know that its really important to steam your fabrics before you cut them? This helps to remove the natural elasticity from the fibres and helps with shrinkage. You can also wash the fabrics before steaming them as this also helps to prepare the fabric.
Subscribe to:
Posts (Atom)