Inspiring Makers Series: Silversoles Felted Textiles
View this post on InstagramA post shared by Sian Riley (@sianrileystudio) on
Maker Monday: Shorts
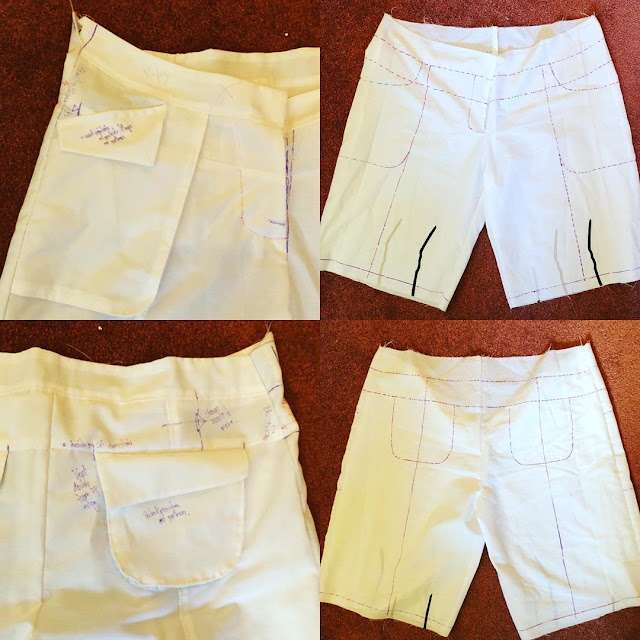
I've made the shorts toile and i can now change the fit and detail positions.
As this pattern was taken from an existing garment i've made some small changes to make them more functional; changes to pocket positioning, different stylelines and the addition of pocket flaps.
Time to alter the patterns before making in final fabric.
Inspiring Makers Series: Stitch Odysey
View this post on InstagramA post shared by Sian Riley (@sianrileystudio) on
Sewing Saturdays: Pattern Cloning - Shorts
I returned to pattern cloning my shorts for a sewing Saturday.
I have one pair of favourite shorts from Next that i have had for years that they sadly don't make anymore, so i've decided to try and take a pattern from them.
As with all pattern cloning pieces, i prefer to make a toile to test the fit and make any changes that are needed. I know i want to change the pockets but there may be a few others changes that i haven't thought of yet.
Flashback Friday: Yohji Yamamoto at the V&A Museum, 2011
Inspiring Makers Series: Emma and her Machine
Tailored Coat: Its Finished!!!!!
I've made sure that the coat has all my little specifics (hidden pockets - i hate when they're on show; high collar - keeps the wind off my neck; long length sleeves - normal sleeve lengths look too short on me; and hidden fastenings - i don't like when i can see the fastening as the coat falls smoother when they're hidden). It has room for the multiple layers i wear in winter but the pure wool fabric should help to keep me nice and warm!
It was a mammoth job and not without its challenges, but i'm really pleased with the outcome (and that its over!).
Right what sewing project to tackle next?
 |
 |
 |
 |
 |
Tailored Coat: Finishing the Sleeves
On the home straight now...
Its time to connect the lining to the outer fabric at the cuffs, which means more handsewing to secure the sleeve hem! The sleeve opening in the back sleeve seam has been topstitched closed and the underarm points have been topstitched in place to stop the lining moving too much.
Nearly there!
Tailored Coat: The Handsewing
The amount of handstitching that has gone into the interior of this coat is beyond words! Making sure that the seams lie flat and pieces are secure on the inside has taken an extremely long time. A mixture of running and slip stitches has been used, but hopefully this will help the coat hang well when its turned the right way through.
Inspiring Makers Series: Toft UK
Maker Monday: Fabric Stash
The Tailored Coat: ...up next is ...
 |
 |
...Care labels and Linings for my tailored coat.
Did you know that its really difficult to get a 'Me Made' garment dry cleaned if it doesn't have a care label? But don't worry, its quite easy to make your own; use the same permanent fabric label pen and cotton fabric that was used for the back neck label to draw the symbols and fabric contents.
If you're not sure what symbols match with your fabric, a quick google search of fabric properties should help or ask at the fabric shop where you purchased the fabric what the composition of the fabric is. You can also use this handy symbol guide from I Hate Ironing (great name!) to help as well. This will give some idea of what to put.
My symbols mean:
> Do Not Machine Wash
> Dry Clean
> Do Not Tumble Dry
> Do Not Bleach
> Iron, Medium Temperature
The lining is now all sewn together and the hems have been pressed ready to be secured in place...time to turn it through the gaps left in the sleeves.


